Leaderboard


Popular Content
Showing content with the highest reputation on 06/04/19 in all areas
-
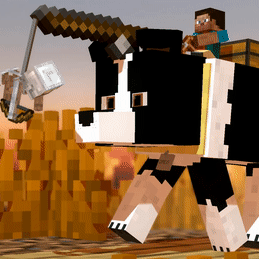
So i've been experimenting with different ways of creating smooth body bends for a while, i recently found a way to make a body bend that only uses 1 single part. This reduces the lag it produces by like 25 - 50% , I don't know when i'm going to be releasing this but hopefully sometime soon. gifs and pictures VVV https://gyazo.com/3bcd328ad837734fc578ee5c5a729f6e https://gyazo.com/5ee8669d1722e4772270cda84aad796f https://gyazo.com/7a68b2c891906bf6e2da3d9ba473ca5e https://gyazo.com/9264ce465627eaaafb25b72ed7ae8693 It features: Smooth body bend that is not extremely sensitive. ankels and wrists. Full character second layer support (although atm it's bugged at the sharp bends) Bugs: The second layers bend like they're in realistic bend mode even though it's set to blocky. https://gyazo.com/9000e4d0fa49c2f577998de947d2bb77 I still haven't made the 3 pixel arms version yet, so when i've hopefully found a way around this bug and made the alex version i think it's ready to be released. Let me know what you think!7 points
-

Birch Forest (2k)
F animation and 3 others reacted to PigmanMovie for a topic
hey! so the trees that were used in this render is a tree that I made for the Environmental Props Pack Industrial and Indoor Update idk when the update will came out but, hopefully soon. bye4 points -

Skywars: Lucky Blocks
DragonPixel and 2 others reacted to Pixel Nitro for a topic
give me feedbacks and stuff i need to improve3 points -
(1).thumb.png.df1c07ae5d480447f5d09bc0852ad2b8.png)
Updated Schematics
Hectoris919 and 2 others reacted to HeYoNia for a topic
Straight to the point add more frickin' schematics for christ's sake, It's been 3 years still no Pillager Outposts, still no Mansion thing still no uhh things that 1.12-1.14 added y u do this Nimi3 points -

Minecraft Endgame
MysticCoyote and 2 others reacted to SanityPants for a topic
3 points -
Look at this mug: You can change his color But also, there's stripes on it so you can customise your mug even more! It also have skim milk on it, but if you change the color, it will turn into coffee ? And if you're not convinced yet, then look at Dan over here: He's really satisfied by his mug! So you should definitively download it!3 points
-

Tokyo Ghoul Kaneki's mask rig (Mine-imator 1.2.4)
Mr.Demo and one other reacted to Greennovice for a topic
This is my first rig https://www.youtube.com/watch?v=CAPunx2RF2o&t=1s Downloda link:http://www.mediafire.com/file/4gec3hmkn2pxtcv/mask.rar/file2 points -
Hello there, guys! I made very easy rig, but i hope that someone will use it. Lucky Block from Hypixel SkyWars • Experiment: Lucky Block You can change color of the Lucky Block and... It's all!? Download Link Don't need credits but it will be very nice :з2 points
-

minecraft earth for nintendo 3ds when
Cryptic Runner and one other reacted to mbanders for a status update
minecraft earth for nintendo 3ds when2 points -
Bus Prank
LeonardoWithMC and one other reacted to TheCollieStalks for a topic
Credit to @Dawid24M for the bus model (the model was really easy and fun to work with!) Credit to @Ghatos for these nice low detail vehicles driving in the background (the model was exactly what I was looking for, with lots of variations and fits nicely on this city road!)2 points -
.thumb.gif.1e8463f6e6e43e8f1296f607bcf94be8.gif)
Steve And The Chest
Sticknub reacted to YourNormalPersonDavi for a topic
i finally upload a MC Animation!!!!! yay. also share ur opinion about this animation plz.1 point -
1 point
-
Made this neat little image to test out a rig of my OC and to test out my Mine-Imator skills, among other things. Looks like Wally has herself in a pickle with a curious Enderman! He doesn't seem like all of the others, though. Wonder what's up with him...?1 point
-
If you see a bug, your first line of defense is water. Sprinkle some water on it. Most bugs don’t like it. What? It’s still alive? I dunno, whack it with a shoe. What? The spider is IN the shoe? Uh... call mom. She knows how to kill it.1 point
-

Normal-Map mod (only suggestion)
Draco63 reacted to NerdPlayGround for a topic
Can someone please make this mod. Blocks with Normal-Maps would look awsome.1 point -

Emotional
IraelianEnergy reacted to Fray for a topic
Nice lighting and everything but Im having mixed emotions...1 point -

Smooth playermodel
TheJeweledWolf reacted to 9redwoods for a topic
Step aside, nimi.1 point -

Confusing fact: This is a fact.
Korbs reacted to Cryptic Runner for a status update
Confusing fact: This is a fact.1 point -

More Rain
9redwoods reacted to Mineshaft Animation for a topic
Rain looks fake and the logic behind it does not work with it tilting and that building on the right side being there.1 point -
UPDATE: Anatomy is still hard.1 point
-
OH HELL YEAH!1 point
-

a pillagers render test
CoLahaust reacted to ShinyGHASTTear for a topic
actually its just a lighting render test, but i'll just post it here i also made the logo for it lol1 point -

Car rig Requests [ currently closed ]
SuperNerdNathan reacted to Primatium for a topic
this volkswagen electric bus, kinda futuristic1 point -

Car rig Requests [ currently closed ]
SuperNerdNathan reacted to Yoshifan33 for a topic
He doesn't HAVE to model them. They're called requests because they're just that: requests. he can reject things people request, y'know1 point -
it happens to me sometimes too. it's just that the render takes so much processing power that the camera just freezes.1 point
-
1 point
-
gonna post this here for 9 rep i put around 4/10 efforts into this i really don't like this wallpaper lol1 point
-
Just something i threw together1 point
-
Blue Forest [wallpaper/render]
CoLahaust reacted to crustyjpeg for a topic
hey i made this thanks to the dudes on the foreign affairs discord server for some ideas also a version with all of the very good ideas: anyway i hope you like it kthanksbye1 point -

How to Break Glass
IraelianEnergy reacted to SharpWind for a topic
How to Break/Shatter Glass! Sooner or later (if you haven't already) you'll come across a point where you need a glass pane or a window to break! Doing that is sometimes tricky, but it only matters you take on it right! As usually, there are 2 methods you can do this with: First method - Particles! - (easier to create, more practical, not as realistic) You want to make a custom image for particles. I best recommend you to copy Mine Imator's original one and modify it, so you know what you're doing (but be sure to COPY it, not take the original!). Mine Imator --> Data --> Minecraft --> the .zip file --> assets --> minecraft --> textures --> particle. On the image, you should see a bunch of familiar states of Minecraft particles. At the same time, you should open the glass block texture, which can be found in the same directory; ... textures --> block. Then select parts of the glass texture you want to use as particles and paste them in the particle texture over existing particles (replace existing particles with bits of the glass block - that's why you needed to copy the image). Once you have added 5 glass particles or so, save the image anywhere, and save it with the .png format! From then, open Mine Imator and make a new particle spawner. Set the spawn rate not to be constant and determine how you want particles to move (assuming you know how they work - if not, i'm making a tutorial on particle spawners once the idea gets voted). When determining the particle, select the texture we've just made and click on one of the glass pieces we've added in as a particle. Lastly, on the point of impact, make the glass block invisible and make the particle spawner summon the glass particles - your glass block just shattered! Second method - Items! - (as realistic as it gets, harder to create and even harder to animate) For this part, we're going to be using an itemsheet - i'll include a download link to several itemsheet presets i made on the bottom of this post. Do the same as we did with the particle method, but we need to use up all pixels of the glass block, so if you put all the items thogether, you'd get a face of the glass block - which is exactly what we're doing right now. Open Mine Imator and import a new item, change it's texture to the texture of the itemsheet with glass we've just made. Select the first item texture and place it somewhere, then adjust it's rotation point, so the item is in the center (it usually only requires you to adjust the Y value). Add more items until you build the glass block face and all items have their rotation points in the center. Then place all your items in a folder and duplicate it 5 times until you build the entire glass block. If you want to animate the glass block shattering, you need to animate each item flying out of the block. If you want to animate the items flying out in an arc, place individual items in a folder. Then move the item outwards with a linear transition and rotate it as you wish. Then create the first and the last keyframe on the folder and raise the folder up in the middle of the action. From then just give an "ease out" transition to the first folder keyframe and an "ease in" to the second one. For anyone who is confused with the explanation above, i've also made a video tutorial explaining it: Itemsheet presets link: http://www.mediafire.com/file/hc6s2ypwyd741rc/Sharp's+Itemsheet+Presets.zip ~Stay Sharp1 point -

Welcome!
Entibrine303 reacted to david for a topic
Today, December 20th, marks the beginning of the Mine-imator forums! Here you can exchange tips, ideas, resources, creations and hold discussions around the animation studio Mine-imator, the game it was based on or anything you'd like! I hope you have a good time here! Main categories: Mine-imator forums discussion Mine-imator discussion Minecraft discussion Off topic discussion Remember to follow the rules, which all categories of this forum uses:1 point -

Steampunk-ish
Paul FoxAnimator reacted to Just Philip for a topic
(I was wrong. It does need criticism. Thanks for the CC everyone.)-1 points