

Reputation Activity
-

 iFallOffStuff got a reaction from FoxyThePirate2704 in How to make face rigs ( for beginners)
I have recently become interested in face rigs, and , although I 'm not very experienced I feel like I haven't contributed an awful lot to the MI community. So here it is, face rigs for beginners! This tutorial is for those who are looking to use this guide to make their first face rig. Any questions you have comment below!
Step 1 : Finding The Right Tool
To make a face rig the first tool you need is a photo editing/paint tool. However, it can't be any paint tool... there is one requirement:
.It must save transparency, transparency allows you to load an file into MI (or any other programme for that matter) and have your chosen areas remain see through. This is essential.
Some tools you could use are:
Photoshop ( costs money, unless pirated)
Gimp ( Free and a generally useful tool)
Paint.net ( Another free and very useful tool)
Pixlr - ( Free , I have no experience with this tool , it was suggested by Tiedmes)
For this tutorial, I will be using paint.net.
Step 2: Editing the skin
Once you've got your paint tool open, you need the skin you want to edit (make sure, before you start editing, that you have a checkered grey and white background).
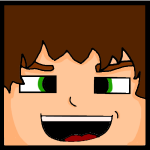
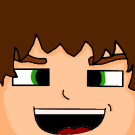
Select the eraser tool and edit out the eyes and the mouth, so that you can see the background through it. Once you're done , It should look like this (some people prefer a 2x2 eye size instead of the 1x2 eye size i'm using). Remember to save it! You'll need it again later!
Step 3: Loading it into MI
This is a simple step, it starts getting a bit more complicated in the next step.
.To load your rig into MI, simply spawn in a Steve ( or Alex ) into your project. Then, on the far right hand side of your mine - imator interface, you will see project properties. Click this and then click libary. Here you will see all the items in your project. Find the Steve you just spawned in and click on it, you should see a skin tab slightly below it.
. Click this, then change the skin to the file that you just edited ( the one where you erased the eyes and the mouth). You should now have a weird looking character.. something like this :
Step 4: Building
Ok, this is where it gets a bit harder... but if you follow these steps it should be easy.
You need to decide what part of the face you will edit first, I'm going to edit the eyes ; the simpler component.
The eyes contain 3 items :
.the eye whites
.the pupils
. the eyebrows
. The obvious part to start with is the eye whites, for this, I just use a cube. Load one in from the crafting table and parent it to the head. If you like a neat timeline, you might want to create a folder called something like "Rig Parts." Scale the cube down so that it covers both the eye sockets.
. Next, we'll do the pupils, like the eye whites, we'll be using a cube. Load it in, parent it like you did with the eye whites and scale it down. This time you may want to adjust it's depth as well. Once you've done one pupil you can easily duplicate it and move it other to the next eye. Great! We're almost done with the eyes.
Final part, the eyebrows! These are as simple as the eyes, and the exact same process. Eyebrows are usually about the same length as the eye sockets, you may want to take this into consideration. Like you did before, spawn in a cube and scale it down so that it is a thin rectangular shape. You may wish to angle it upwards slightly. Again, we can duplicate the one eyebrow to make two. This time however, you will need to change the rotation slightly.
And that's it! You should now have a face rig complete with move-able pupils , eyebrows and I guess.. if for whatever reason you need to move them, eye whites. .
Step 4.5: The Mouth
The mouth is ( in my opinion ) the key part to any facial rig, not only can a good mouth rig indicate who's speaking, it can also show expressions. In my mouth rig I will be having 5 components, although, after the end of this tutorial you should hopefully be able to add more so that the mouth suits your needs. My components are:
.Mouthbox
.Teeth (Lower and Upper)
.Mouth top
.Mouth Bottom
.Mouth sides (left and right)
To start the mouth rig we're going to need to go back into the editing tool you used originally and open the skin with the mouth and eyes edited out. We will have to make the areas around the mouth the same colour, so that when we build the mouth itself, we can have it blend in naturally. So pick a colour (similar to the rest of the face) and basically.. give him a beard. Just paint all around his mouth. Notice this in the picture (you may want to also make a note of the hex code so you can match the tone exactly in MI).
One you've done that, simply do as you did at the start of the tutorial. Go to libary > human > and change the skin to the file you just made.
Step 5 : Building the Mouth
To build the mouth I usually start with the lower and upper mouth. These are simply to rectangles the user can use to open and close the mouth. The size doesn't matter too much, as you can always resize it to your specific needs. The only scale value that really matters is the x, the other can be rough guesses as to how you will need it. Now, spawn in a rectangle and scale it so that it is almost the same length as the head and height value (Y or Z ) Covers about 1/8 of the mouth. Once it's been scaled match the tone of the cube, to the rest of the mouth. Next, copy it and mouth it upwards, out of sight, to form the upper mouth.
Next, I will create the mouth box?? ( The red part you see when you open your mouth). This is pretty simple : a red cube that goes inside his head to form the back of the mouth. Once you have done this step, you should no longer be able to see the background through his mouth. Most mouth insides tend to be a dark red.
Great! The mouth is really beginning to take shape, the obvious place to go from here is the teeth. So that's what I'll make next. The lower and upper teeth are usually seperate, this gives the animator more freedom when he or she is using your rig. The teeth are simply two rectangles that are tall enough so that they can meet in the middle and long enough so that they can cover the whole length of the mouth. After doing one row of teeth, you can duplicate it to make the other row. Almost done! Just one more step! The mouth looks quite square in the pictures, I'm going to show you how to fix that.
The last step is making the mouth sides, these are two skin coloured rectangles that allow your character to expand and compress his mouth. Sadly, though, it's not quite that simple. I make my sides so that the character can smile easily. To do this, I rotate the rectangle at 45 degrees and re - scale it. This can get a tiny bit hard but after this... you're done! I find it easier to spawn in another cube and parent the two together. This forms a nice diagonal line. The last step is to duplicate the rectangle and simply rotate it so that it is symmetrical on both sides. Then you're done! You're face rig will most likely look a lot better than mine as I need to go for dinner now... so I kinda rushed the end. Here's the finished product :
Also, this is my first MI tutorial so please take the time to fill out the poll and comment any advice you have! Hope you enjoyed!
If you did find this helpful , why not post your finished product below? I'd be interested to see what you come up with!
-
 iFallOffStuff got a reaction from Yoshifan33 in How to make face rigs ( for beginners)
I have recently become interested in face rigs, and , although I 'm not very experienced I feel like I haven't contributed an awful lot to the MI community. So here it is, face rigs for beginners! This tutorial is for those who are looking to use this guide to make their first face rig. Any questions you have comment below!
Step 1 : Finding The Right Tool
To make a face rig the first tool you need is a photo editing/paint tool. However, it can't be any paint tool... there is one requirement:
.It must save transparency, transparency allows you to load an file into MI (or any other programme for that matter) and have your chosen areas remain see through. This is essential.
Some tools you could use are:
Photoshop ( costs money, unless pirated)
Gimp ( Free and a generally useful tool)
Paint.net ( Another free and very useful tool)
Pixlr - ( Free , I have no experience with this tool , it was suggested by Tiedmes)
For this tutorial, I will be using paint.net.
Step 2: Editing the skin
Once you've got your paint tool open, you need the skin you want to edit (make sure, before you start editing, that you have a checkered grey and white background).
Select the eraser tool and edit out the eyes and the mouth, so that you can see the background through it. Once you're done , It should look like this (some people prefer a 2x2 eye size instead of the 1x2 eye size i'm using). Remember to save it! You'll need it again later!
Step 3: Loading it into MI
This is a simple step, it starts getting a bit more complicated in the next step.
.To load your rig into MI, simply spawn in a Steve ( or Alex ) into your project. Then, on the far right hand side of your mine - imator interface, you will see project properties. Click this and then click libary. Here you will see all the items in your project. Find the Steve you just spawned in and click on it, you should see a skin tab slightly below it.
. Click this, then change the skin to the file that you just edited ( the one where you erased the eyes and the mouth). You should now have a weird looking character.. something like this :
Step 4: Building
Ok, this is where it gets a bit harder... but if you follow these steps it should be easy.
You need to decide what part of the face you will edit first, I'm going to edit the eyes ; the simpler component.
The eyes contain 3 items :
.the eye whites
.the pupils
. the eyebrows
. The obvious part to start with is the eye whites, for this, I just use a cube. Load one in from the crafting table and parent it to the head. If you like a neat timeline, you might want to create a folder called something like "Rig Parts." Scale the cube down so that it covers both the eye sockets.
. Next, we'll do the pupils, like the eye whites, we'll be using a cube. Load it in, parent it like you did with the eye whites and scale it down. This time you may want to adjust it's depth as well. Once you've done one pupil you can easily duplicate it and move it other to the next eye. Great! We're almost done with the eyes.
Final part, the eyebrows! These are as simple as the eyes, and the exact same process. Eyebrows are usually about the same length as the eye sockets, you may want to take this into consideration. Like you did before, spawn in a cube and scale it down so that it is a thin rectangular shape. You may wish to angle it upwards slightly. Again, we can duplicate the one eyebrow to make two. This time however, you will need to change the rotation slightly.
And that's it! You should now have a face rig complete with move-able pupils , eyebrows and I guess.. if for whatever reason you need to move them, eye whites. .
Step 4.5: The Mouth
The mouth is ( in my opinion ) the key part to any facial rig, not only can a good mouth rig indicate who's speaking, it can also show expressions. In my mouth rig I will be having 5 components, although, after the end of this tutorial you should hopefully be able to add more so that the mouth suits your needs. My components are:
.Mouthbox
.Teeth (Lower and Upper)
.Mouth top
.Mouth Bottom
.Mouth sides (left and right)
To start the mouth rig we're going to need to go back into the editing tool you used originally and open the skin with the mouth and eyes edited out. We will have to make the areas around the mouth the same colour, so that when we build the mouth itself, we can have it blend in naturally. So pick a colour (similar to the rest of the face) and basically.. give him a beard. Just paint all around his mouth. Notice this in the picture (you may want to also make a note of the hex code so you can match the tone exactly in MI).
One you've done that, simply do as you did at the start of the tutorial. Go to libary > human > and change the skin to the file you just made.
Step 5 : Building the Mouth
To build the mouth I usually start with the lower and upper mouth. These are simply to rectangles the user can use to open and close the mouth. The size doesn't matter too much, as you can always resize it to your specific needs. The only scale value that really matters is the x, the other can be rough guesses as to how you will need it. Now, spawn in a rectangle and scale it so that it is almost the same length as the head and height value (Y or Z ) Covers about 1/8 of the mouth. Once it's been scaled match the tone of the cube, to the rest of the mouth. Next, copy it and mouth it upwards, out of sight, to form the upper mouth.
Next, I will create the mouth box?? ( The red part you see when you open your mouth). This is pretty simple : a red cube that goes inside his head to form the back of the mouth. Once you have done this step, you should no longer be able to see the background through his mouth. Most mouth insides tend to be a dark red.
Great! The mouth is really beginning to take shape, the obvious place to go from here is the teeth. So that's what I'll make next. The lower and upper teeth are usually seperate, this gives the animator more freedom when he or she is using your rig. The teeth are simply two rectangles that are tall enough so that they can meet in the middle and long enough so that they can cover the whole length of the mouth. After doing one row of teeth, you can duplicate it to make the other row. Almost done! Just one more step! The mouth looks quite square in the pictures, I'm going to show you how to fix that.
The last step is making the mouth sides, these are two skin coloured rectangles that allow your character to expand and compress his mouth. Sadly, though, it's not quite that simple. I make my sides so that the character can smile easily. To do this, I rotate the rectangle at 45 degrees and re - scale it. This can get a tiny bit hard but after this... you're done! I find it easier to spawn in another cube and parent the two together. This forms a nice diagonal line. The last step is to duplicate the rectangle and simply rotate it so that it is symmetrical on both sides. Then you're done! You're face rig will most likely look a lot better than mine as I need to go for dinner now... so I kinda rushed the end. Here's the finished product :
Also, this is my first MI tutorial so please take the time to fill out the poll and comment any advice you have! Hope you enjoyed!
If you did find this helpful , why not post your finished product below? I'd be interested to see what you come up with!
-
 iFallOffStuff got a reaction from Astro Animations in Marwan VS Kaydo
Ok here are my thoughts, what I'm about to say has probably already been said but I'm too lazy to read all the comments (despite the fact I like comments like those).
The animation was shorter than most test animations I've seen... your intro and outro took up at least 3/4 of the video. Also, the intros and outros aren't even that good. You can find better templates online that you can use.. or just make one yourself, that way it shows your style and your skills.
The actual animating... you didn't use the face rigs at all except for them to shut their eyes slightly. The animation makes no sense, it has no story line whatsoever. Also, why do the characters start walking then suddenly break into a run. Final point on animating: That fall could be animated much smoother and more realistically, maybe he could drop his sword?
The after effects aren't great either, the sun doesn't fill up the whole sky with sun rays.. it fills up just a portion, so I'd recommend fixing that.
Your sound effects don't sync up either. Enough said.
I'm not even gonna bother mentioning your English .. incorrect English really downgrades your animation.
Basically, put in much more effort I've made one animation so far (starting my second) but I put in a decent amount of effort (I think) and got good feedback.
Wow.. I wrote a lot more than I planned
-
 iFallOffStuff got a reaction from King of skulls in Test fight with bow (Warning: Blood & Gore)
Wow, really cool :0 Nice job
-
 iFallOffStuff reacted to Jpman11 in Jp's Sword V2
Hey everyone! I made this cool sword for anyone to use.
If you decide to use this, YOU MUST credit me.
---
Here's some pictures:
http://imgur.com/PjPLFbt
http://imgur.com/fPaFSge
http://imgur.com/kD8Fg6k
http://imgur.com/JM6Ygg4
http://imgur.com/QgBpSp8
http://imgur.com/Jp1xkxi
http://imgur.com/MmrgH1j
http://imgur.com/IrjcvIi
http://imgur.com/TZyJDid
http://imgur.com/ihfTCgJ
(Sorry I couldn't put them directly on the thread. Imgur doesn't want to work with me today :/)
Download:
http://www.mediafire.com/download/d4ak0b2d85lvq41/Jp's+Sword+V2.mproj
-
iFallOffStuff reacted to Rytaur in Carcharodontosaurus Rig
I remodeled the my carch rig again to make it look better (not exactly more accurate). Big difference is the head is now no longer overlapped by the neck.
Also no texture glitches this time.
Download:
http://www.mediafire.com/download/beot62b8xjgymag/Carch+3.0.zip
-
 iFallOffStuff got a reaction from ShadowGMC in Marwan VS Kaydo
Ok here are my thoughts, what I'm about to say has probably already been said but I'm too lazy to read all the comments (despite the fact I like comments like those).
The animation was shorter than most test animations I've seen... your intro and outro took up at least 3/4 of the video. Also, the intros and outros aren't even that good. You can find better templates online that you can use.. or just make one yourself, that way it shows your style and your skills.
The actual animating... you didn't use the face rigs at all except for them to shut their eyes slightly. The animation makes no sense, it has no story line whatsoever. Also, why do the characters start walking then suddenly break into a run. Final point on animating: That fall could be animated much smoother and more realistically, maybe he could drop his sword?
The after effects aren't great either, the sun doesn't fill up the whole sky with sun rays.. it fills up just a portion, so I'd recommend fixing that.
Your sound effects don't sync up either. Enough said.
I'm not even gonna bother mentioning your English .. incorrect English really downgrades your animation.
Basically, put in much more effort I've made one animation so far (starting my second) but I put in a decent amount of effort (I think) and got good feedback.
Wow.. I wrote a lot more than I planned
-
iFallOffStuff got a reaction from King of skulls in Marwan VS Kaydo
Ok here are my thoughts, what I'm about to say has probably already been said but I'm too lazy to read all the comments (despite the fact I like comments like those).
The animation was shorter than most test animations I've seen... your intro and outro took up at least 3/4 of the video. Also, the intros and outros aren't even that good. You can find better templates online that you can use.. or just make one yourself, that way it shows your style and your skills.
The actual animating... you didn't use the face rigs at all except for them to shut their eyes slightly. The animation makes no sense, it has no story line whatsoever. Also, why do the characters start walking then suddenly break into a run. Final point on animating: That fall could be animated much smoother and more realistically, maybe he could drop his sword?
The after effects aren't great either, the sun doesn't fill up the whole sky with sun rays.. it fills up just a portion, so I'd recommend fixing that.
Your sound effects don't sync up either. Enough said.
I'm not even gonna bother mentioning your English .. incorrect English really downgrades your animation.
Basically, put in much more effort I've made one animation so far (starting my second) but I put in a decent amount of effort (I think) and got good feedback.
Wow.. I wrote a lot more than I planned
-
-
-
iFallOffStuff reacted to AnxiousCynic in The Enderpearl Quarrel
So instead of making short bits of animation specifically in/for my tutorials, I decided to make an "actual" animation that featured some of the techniques I plan to do in my upcoming tutorials. k bai.
-
iFallOffStuff reacted to Menace in Out of ideas.
Hi!! everyone. It was so long time i didn't come to visit Mi forums. (cause i'm lazy)
-
iFallOffStuff reacted to Tomoki in [4k] Runners
Hello, today I bring you.. Le Wallpaper
(click on it for the full size)
no snips today.
Credits
Thanks for... um looking at my wallpaper I guess?
Bye.
-
-
iFallOffStuff reacted to NovaCeres in Reskinable Various Bug Armors - Rig
So yah!
Im releasing my bug Armor Rigs!
Armor:
Dragonfly Female and Male
Wasp Female and Male
Butterfly Female and Male
Spider Female and Male
Pics:
To Reskin:
Select Head of either female or male and put your skin texture on the head.
Simple!
Download:
http://www.mediafire.com/download/cv769cq57pcfbum/Lifepod_5.mproj
-
 iFallOffStuff got a reaction from -StickyMations- in Steve vs mobs: redstone the invention - Minecraft animation
I reckon you get the point about monster school.. so I'll comment on the animation.
Considering it's your first animation it's not too bad... maybe use a few more bends at times. But please... don't do monster school again
-
iFallOffStuff reacted to NietyFox in Red and Yellow [2K] [Wallpaper]
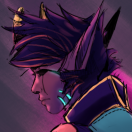
Red and Yellow don't go well with each other.
Yes the Yellow guy is floating. Just the whole scenery is dark.
-
iFallOffStuff reacted to ShadowUnicorn_Gaming in 3D Sword rig by ShadowUnicorn_Gaming
Moar pics
Download Now it's free! And No credit is required AT ALL
-
iFallOffStuff reacted to zoocomicsx in MineWars Episode 1: Exile
MineWars is out after 3 hard months of production and FSP is now public to anyone who wants to help with episode 2 which is now in production let me know if you want to help!
Keep in mind this may not be that good of an animation but this is just a pilot and our first project as a team, episode 2 will be MUCH better with your help! We're trying to get production down to 1 month per episode. Hope you like it
-
iFallOffStuff reacted to -StickyMations- in "Last Days Alive" - My NEW Minecraft Animation! Finally Here! :D
YES! FINALLY! It's here!
I have no more words to say, just go and watch it in 1080p!
Thank you so much for watching it!
I've been working on this for 7 MONTHS! But don't worry, this doesn't means you'll need to wait another
7 months for another video, NO! This project in particular had some problems... Oh yeah and my motivation was crappy.
=========================================================================================================================
And well... that's it, my new animation, the hardest project I made so far...
For this post, the only thing I'd like to do, is to reach 15 likes, that's it, If we reach that I'll be pleased.
Oh and It'll also boost my motivation to make another video
(EDIT: Lmao, you guys broke that like goal, Thank you!)
People who asked to be tagged:
@BBruce7815 @NoelKreiss @Slime @MobKiller Animations
More stuff is coming! Hope you enjoy!
-
iFallOffStuff reacted to SahnzAnimation in ARC [Animation Team]
So I decided to try and start a project where I'll put forth a lot of time into, but I realized that it would be way too much work for myself to handle on my own . This lead to me thinking of creating a team to make the project less difficult and less stressful so this is why I'm posting this topic.
I will be working hard with this project and having a team with the project will kind of force me into powering through it leading to a mindset of not letting people down.
General Concept/Plot of "MinecraftARC" (The name of the animation):
Positions that the team would really appreciate having :
If you're planning on joining the team, having Skype would be much appreciated (My skype: Sahnzanimation)
Here's a random wallpaper that I made:
Special thanks to @PuddieTheKat and @TheGodOfTrouble for helping me out with the wallpaper .
Skins used in the image: @SKIBBZ, @PuddieTheKat, @Cryotivity, @WillesFilmz, @BAC0NB0Y, @Ninjabee_Redtricity, @victory summery, @The Tan James, @TheGodOfTrouble, @MobKiller Animations
-
 iFallOffStuff got a reaction from SahnzAnimation in How Dare You [First Lip Sync]
Nice! I've never tried lip syncing before but this looks good to me.
-
-

-
iFallOffStuff reacted to EpicJ in Point Blank
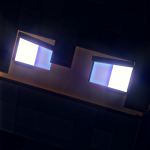
So i did a wallpaper again. I wanted to try something with a bit more motion this time, as posing is very heavily based on portraying movement.
[EDIT] I brightened it up a little and switched up the camera angles too. It actually looks a lot better now i think.
[Old]
Shotgun and SFOD(The military guy) rigs by @castedshadow98
Player template rig that my character is based on by @SKIBBZ(We miss you)
I know it's dark. It is supposed to be dark.
Here's a more blurry version for the lols:
-
Recently Browsing 0 members
No registered users viewing this page.