Search the Community
Showing results for tags 'ik'.
Found 8 results
-
 In this post, I'll show you how to make a turret tracking (or a tracking system with multiple points of rotation), all the blocks placed in this tutorial are here to illustrate and are not necessary. We'll open modelbench to start creating our turret, nothing is needed to be imported. When opened, we will add 3 or 4 parts to the model : - a first part I named "turret (don't move)" made to don't break the model and isolate our system - a second part I named "y rotation" which will be the section tracking left and right (Y=0 obligatory) and parented to "turret (don't move)". - a third part I named "y axis" which will set the axis (Y=-20, you are kinda free with thiw one as long as it's a negative value) - a fourth part (optional) I named "turret base" parented to the "y rotation" and used just to add the blocks to decorate as well as changing the rotation more easily The organisation without the "turret base" will look like this : The different position and rotation of each new parts : Everything is set and we can start to add the IK we will use to track on the Y axis, open the bend section of "y rotation". Activate the "X axis" and leave the range and default angle as if. Now, we'll go to the end of this section and put the part at "Lower", the "Joint offset" at -1 and the "Joint end" at 1. I choosed "Lower" because our axis is set lower and the "Joint" parameters at -1 and 1 to be sure to don't have weird things happening. Our first axis is done, we can move to the second axis. For the Z axis, we will duplicate what we just made and modify how it's set in the Elements list. - I added a part named "cannon" parented to "y rotation" and with a Z rotation at -90° and a Y position at 22 in our case - "y axis" (I renamed "Z axis") will be parented to the "y rotation" with a X position at 40 in our case and a Y position at 22 (the same Y position used for the "cannon") - "y rotation" (I renamed "Z rotation") will be parented to "cannon" - "turret base" (I renamed "cannons" and still optional) is still parented to "Z rotation" and with a Y rotation at 90° In the end, our entire Elements list will look like this : The different position and rotation of each new parts : With the different blocks I added, my turret prototype looke like this : Legend : Now, we can save our model and it's done !! Now come the part where I explain you how to use it in Mine-Imator 2.0.0, open MI and load your model in it with a cube or any other object, I used Steve here with a custom rotation point set at 12 (optional). Open the "y rotation" part we added earlier and the "Inverse kinematics" on the "CONSTRAINTS" section. We'll then choose the thing we want to track, here Steve, so we set the "Target" on "y axis" to lock the bend and then we set "Angle target" on our Steve. We repeat the same steps on the second axis. In the end the "Z rotation" will be set like this : And now, you can play with it. HAVE FUN TAKING DOWN THOSE PESKY LITTLE FLYING THINGS !!! :3 Little tip : Precision :
 -
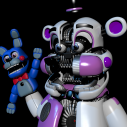
Hi, Cable here. Have finished the MetalGarurumon model. I was planning to shade it so I use mainly 3D planes for this polygon model, which is why it turns out to be so lag. Here is the showcase: There is also an IK version. Since it's my first time trying IK on such model, it is kinda wonky. You can find more details of this model here: When using: Since color-labeling and timeline-ghosting/IK are used, this model only supports Mine-imator 2.0.0 or later version Import the .miobject to load this model This model should work under blocky bend Enabled timeline-ghosting to hide unnecessary parts. Some of the parts have been color-labeled to help with posturing and positioning Glowing parts are labeled with yellow, you can also access them at once by search '[Glow]' at the timeline searching bar For IK version, when imported, reset the property of the whole model‘s position twice, which sets the Paws to the right position For IK version, IK Controllers are added to help with posturing and positioning, they are hidden in HQ rendering About lags. This model includes thousands of shapes and most of them are 3D planes (my bad), so it would be kinda laggy when moved or bent. IK version is probably more laggy compared to FK version when moved Modification is allowed. The shading of it wasn't good. I wasn't motivated enough to re-shade it, especially considering the lag and quantity of shape. Download: You can go to My Ko-fi Shop and download the FK&IK version of this model for free Or go straight to FK Version Shop Page or IK Version Shop Page for the download These models are free, I would greatly appreciate it if you would like to name your own price to support me. This is probably the last polygons model of me in the near future. Considering the time and energy consumption, I planned to stop modeling in this style and try other styles instead. Kinda off topic but here is a peek of what I am trying to do: Anyway, credit isn't necessary when using but I will appreciate it if you do so Feedback and advice are wanted on the model Have fun and enjoy!
-
As you can read in the title, none of my .mimodel (made in the 1.1.4 version) have the "IK" in the constraint option. Does someone know the reason of this ? (I guess it's just because Modelbench 1.1.5 didn't follow the MI 2.0.0 but I can be wrong) And at the same time, is there a way to remedy to it ? Thanks in advance for your help.
-
 As far as my 5 days of learning Gamemaker, I managed to implement IK in Mine-Imator (sorta). Below the button of Hierarchy, theres another button called "Activate IK settings" and up there you'll have implemented IK to your desired limb. Sadly the program seems to crash most of the time when you apply this so make sure you save or you may loose your progress. This is pretty much a very Alpha stage of IK but the great thing is that it DOES work, surprisingly, and when it does, it looks like this: Nonetheless here's the code I managed to make in order to implement this into the Mine-Imator sourcecode, note that there are other assets that need to be added if you want to try this yourself in Gamemaker so please be aware that it will not work, I may share the rest of the assets and the code later on, so take a look as it is so far: I implemented this as an importable option in your projects, that means that you import this as keyframes and you'll have the option to use IK in your chosen project. Download this here: http://www.mediafire.com/file/yjd4u4sq94h7cga/Inverse+Kinematics+(import+this+into+your+project).miframes Okay thanks, bye Honestly I got no clue what I'm talking about but hey, I hope you like this
- 22 replies
-
- 18
-

-

-

-
- this aint no april fools. you fool
- upvote please
- (and 2 more)
-
A simple addition where you could set an object or body part to always point towards a set object based on the object's rotation point. Also, with the option for this 'point towards' to affect a body part's bending (so that when, the leg for instance, is straight the leg's lower half will continue bending towards the set object). This function could allow mine-imator users to be able to make their own IK for not only characters, but models and items and etc.. I assume it wouldn't be too hard to add.
- 2 replies
-
- 6
-
-
- suggestion
- update
- (and 2 more)
-
This has probably already been talked about, but I think being able to use inverse kinematics on mine imator characters it would be easier to animate. Personally, I find using ik really easy. Does anyone else have this idea? P.S. if you don't know what ik is, search it up.
-
So I was wondering if IK and FK switches could be added. Like in VMComix's Steve rig for Blender. Just a suggestion!